Photobucket Photobucket Photobucket Photobucket

Sunday, August 7, 2011

Surprising Boy Wonders

Sending out a couple surprises
tomorrow to 2 very sweet boys.  

Super E and Super J
will have many fun adventures
in their new gear!

Aren't they just adorable, aren't they?!
{spoken in the Mrs. Potato Head Toy Story voice}


Thank you again for entering 
my Little Marvels giveaway!

Stay tuned for another giveaway this fall!  


Photobucket

Saturday, August 6, 2011

The Lunchbox Lightbulb!

In a few short weeks 
I will have a little guy heading to school for
a large portion of the day.

I have to admit this summer
I have not given much energy to lunchtime.
The boys eat usually healthy, 
lots of fruits, veggies, but just kind of 
getting it all on the plate so we can get back to playing.
Not much inspired or exciting.  
Picnics inside, picnics outside,
fun but not much planning or structure.
And I am a bit
unmotivated to get into 
the back-to-school routine.

Until...I found Jamie's blog.
{classic ah-ha lightbulb moment!}


Loads of healthy eating ideas, fun presentation, and 
Jamie Oliver's Food Revolution Blog of the Month for June!
My little astronaut-to-be would love this one!  


My goal will be to not set myself up for failure,
but to integrate even healthier and more homemade, fun lunch
options at least a few times a week.
Jamie has ideas for healthy lunchables, granola bites, and more.
I know if I sent a lunch like this one with E,
he would just have an ear-to-ear grin, what?! Yes!

I am also on the hunt for a great lunch bag.
E has seen too many Pack-It commercials
{tell me we're not the only ones!}
this summer vacation.
{he seriously has an infomercial future}
So along with his new Garnet Hill backpack
I got for $9 on clearance last Spring
{score!}
I will surprise him with one.
It's actually a really smart idea!


We also always seem to eat
a bento-style lunch,
lots of variety and stand-alone items, 
so I think E would love these...


{Pottery Barn Kids}
{whoa that's a lot of food!}

The reusable bags, sandwich, snack, etc.
are always great too. 
I hope to make a few, but 
there are some super cute ones
out there, like this one.


And just to contradict the healthy statement I made earlier.
For a special occasion, 
I plan to use these sweet cupcake holders.  


And add some fun straws


{where were these when I was a kid?!}

For me, I like to handwrite notes, 
poems, jokes, silly stuff, encouragement
for as long as I can get away with it {sigh}.

I'd love to hear, what are some of your favorite 
lunchbox  ideas?!  

{michelle}

Friday, August 5, 2011

Look Ma, Them There Is Quadroolets!!

Yes we have actually heard this before and it gets better
read on {grin}

I was out last night with my sweet friend Laura 
{infrequent, but treasured girl time}
 and told her about the reactions we get . 
My friends seriously cannot believe the things we've heard.  
See if you can.  

My skin has become thicker over the past couple years...
after being called Octomom, people telling me they are sorry for me,
and the worse that if they were me, they would have made a different choice,
and since this is my post I get to say,
I thank God it was us and we chose us. 

My favorite {insert sarcasm here} was when we were in a restaurant,
Well they look like normal people.  {what?}
Should we wear underwear on our heads or something?
Good gravy...ridiculousness I tell you.

The only time I am really ticked by it is when 
my older son understands, and people aren't so bright to realize it.
Being the protective bro he is...why are people mean to my brothers?
Now that is sad.    

All-in-all I am a reasonable person,
try to see other sides of things.
So believe me I get the curiosity.  
I just don't get the rude.

If there is one thing I can say about us, it's this...

Putting ourselves through college.
Paying for our wedding and honeymoon.
Buying our home {ok lots left to go on that one!}
Having a son with cancer
Finding our way through insane amounts of medical bills.
Giving birth to 4 preemie babies within minutes of each other.
Having 4 babies in the NICU for weeks.
Living though the first year of quadruplet life.

You see we've got this because 
God has us,
so it's nothing we've done,
it's all Him.  

So instead of being bothered by it
like today when a woman looked like if she 
got too close to me she may just end up having quadruplets herself...
relax, quadruplets are not contagious lady.  
We usually just try and see how long it is before we get
our FCCOTD 
{first crazy comment of the day, just made that up thank you.}.  

On the flipside,
the side I'd like to focus on, the one that matters...
we see how all of our boys make people smile, big ear-to-ear grins.
The extra effort they give to acknowledge big brother.
These comments...
Seeing your boys made my day.
God Bless You.
How are they all so cute?
Wow they did so well!

And even the realistic,
I bet it's so hard now but oh how much fun you will have!  

We get a lot of those too and those far outweigh the rest.

So, Yes they are QUADRUPLETS...YES ALL BOYS,
even the ones with curly hair.
And Yes, that is the most awesome Big Brother
{who is talented in many other ways too}
that you will ever see!  
in our opinion anyhow.  

And while we may wish we had more time, more money, more xyz...
we couldn't wish for more love.
Seriously. Cheesy and all, but true.

Without further ado, I'd like to introduce you to my boys...
I realize I had not done that since I started 
Our Wonderfilled Life a couple months ago.

my loves
{in birth order, with photos full of their personality}


                               and his hunky daddy {ha!}


You can check out the Blog Beginnings button to see more
of their first year
but I write about it all here, my life as a whole,
and am happy to have you reading along!

I hope we brought some happy to your Friday!
{michelle}


Photobucket

Monday, August 1, 2011

TeePee Tutorial {grommet mounted, removable, and so fun!}


I had been dreaming of making a teepee
for a long time, since my oldest was a wee little guy.
It's on our summer bucket list
and  now that I have tackled this project
I LOVE IT!!
even more so 
I LOVE that my BOYS LOVE IT!!

It's been sooo hot here
so this has helped keep us busy inside on these sweltering summer days...


{warning, long post since it's a tutorial, but stick around for the sweet faces at the end!}

With four little ones I can't just clip up a sheet, 
they'd pull it down and I wanted something that looked like a teepee.
They little boys all share a room right now and
we have so many playtents in our home.
I wanted something that took up less space with more room
but it had to be removable for when we need the space.
So I came up with a design using grommets, 
been lovin' grommets lately,
and some twill tape and fabric that I had planned for a valance.

You will also see my new applique pillows from this tutorial.

The Making of a Removable, Grommet Mounted TeePee!

{do I sound excited because I am...you'd think it was for me!}


The teepee is hung using twill tape and a ceiling hook
and is attached to the wall by three hooks using grommets.  

There are a lot of steps, but they are super easy to follow and so worth it
for all the fun to be had in it!!

Supplies
all are quite inexpensive, of course your fabric choice will factor in

fabric
45" decorator fabric x 3 yards
coordinating thread
twill tape
7 yards twill tape at least 1/2 inch width
grommets
3/8" size (3) and grommet punch
hardware
1 1/4" cup hooks white (3)
all-purpose ceiling hook white (1)
Carabiner type clip {1}

Sewing
Fold fabric in 1 1/2" on length and using standard stitch create a seam 
along entire length of fabric


Repeat on along the opposite length of fabric.

Then do same along width of the fabric.
Each side 1 1/2" fold in and sew with a standard stitch.


For a bit less bulk you can fold the corners as I have shown here, 
just sew down the diagonal.  


After both widths of the fabric are sewn,
take your twill tape and sew it on the back side of the fabric
straight down the middle of the fabric.
You will want to use 4 1/2 yards of the twill tape for this step.
Have the twill tape align with the edge of the fabric,
the excess will hang off the other end.


Next we will add the ruching detail.
I didn't want the teepee sides to just lay flat, so
the ruching of the sides adds some weight.

Two separate pockets are created so once the teepee is hung,
each side can be ruched separately {the deluxe teepee version}

Take the length {side} without excess twill tape.
Fold it in 1 inch and stitch along the edge.
Stopping right before the twill tape.


Find your excess twill tape, and cut in in half.
Time to grab a cute little helper with little hands!
Pin one end of your excess twill tape


and thread it through the little pocket you just created, 
pulling it out right next to the other twill tape.


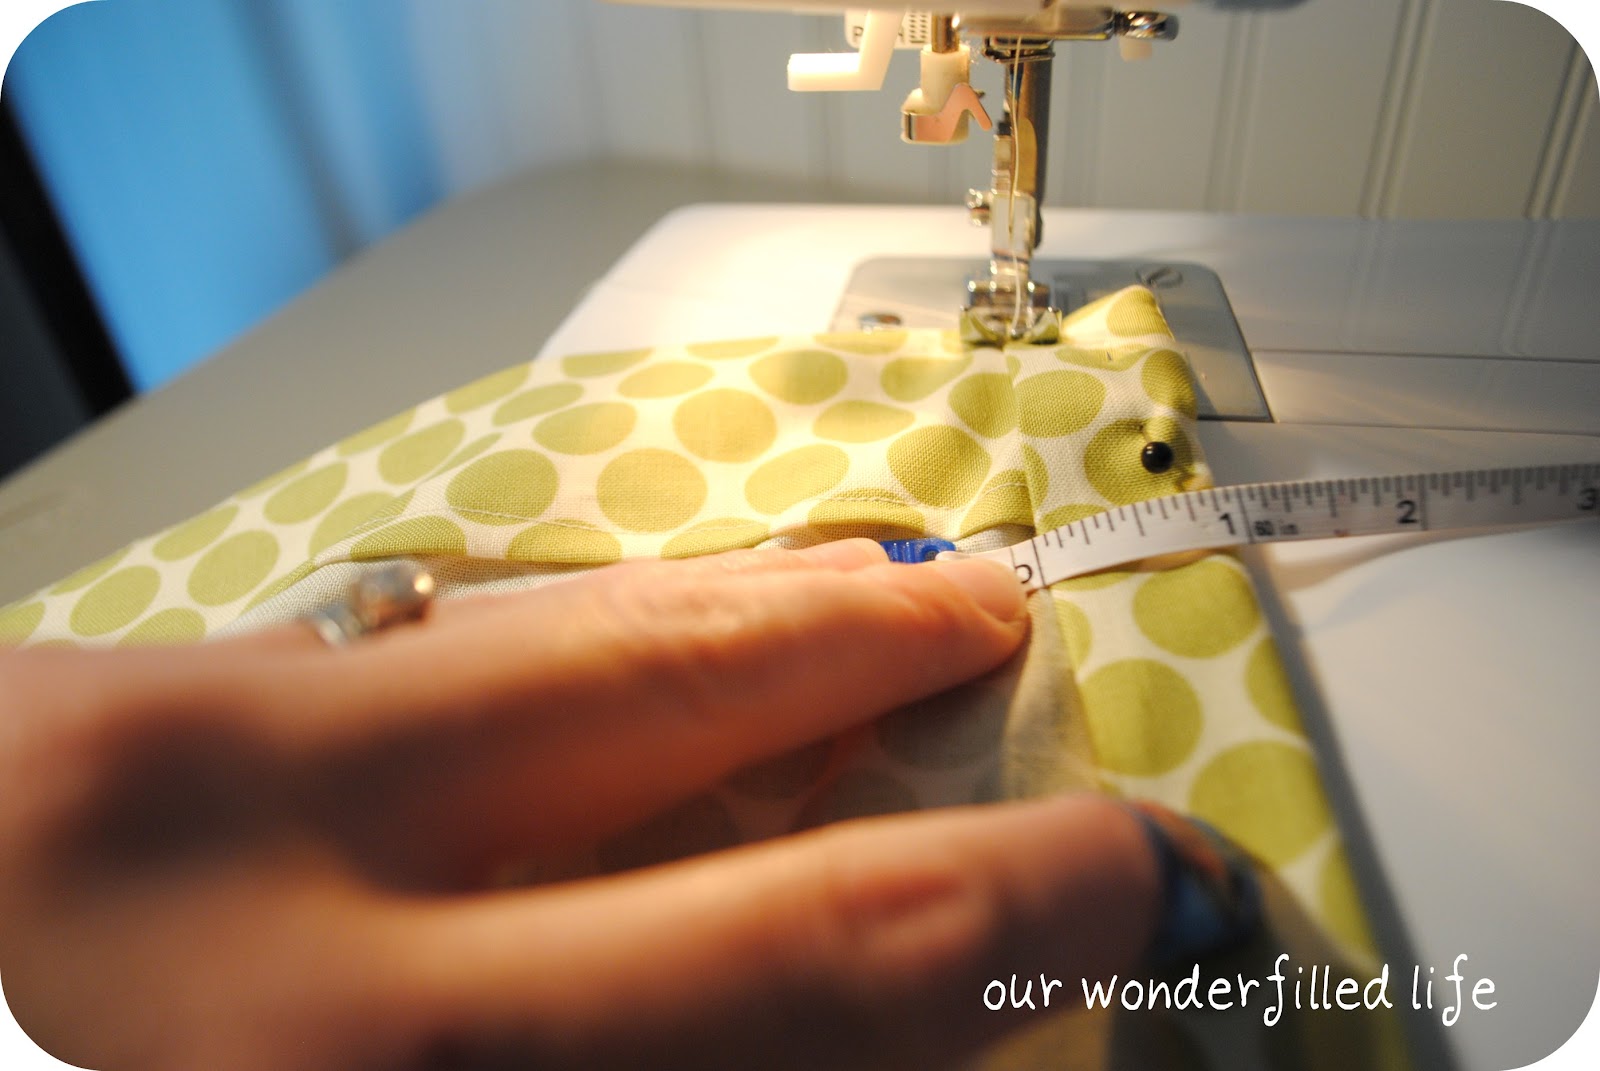
Pin both ends so you do not lose the twill tape inside the pocket. 
Repeat and sew a pocket again toward the center,
thread the twill tape through and secure opposite ends with safety pins.


Cut both twill tapes from the pockets to end at the edge of fabric
Do not cut center twill tape!
Sew both pieces down to fabric.


Then sew center line twill tape over as shown below.


Remove safety pins from opposite ends and secure
I used a couple wooden beads we had {hey it works!}

Grommets
Folding over the fabric above when sewing helped to build up the
fabric to hold the grommets and the weight of being hung.
The grommets are best at the 2 corners and middle edge of the fabric.
So, all grommets will be on the length of the fabric without the excess twill tape.
This is the length of the teepee that will be against the wall.


Mark 3 x's on the fabric for grommet placement.


Follow instructions on your grommet punch
{summon mad amounts of hand strength!}


Hardware Mounting


The spacing worked out perfectly around the windows in the boys room.
We can still get to the blinds behind the teepee.
Mark 3 spaces on the wall and screw the 3 cup hooks into the wall by hand.
Place a grommet on each hook and then pull up the twill tape to the ceiling
and mark the placement for the ceiling hook.


Install ceiling hook with drill and hardware provided.

Hang, ruche away, fuss with, make it look nice
and place a comforter, some big pillows, books, etc. underneath!

I added the flag bunting as a little touch at the end.
I cut out double triangles for each flag, alternating fabrics and
making flags smaller as they reached the ceiling.
Secured with tacky glue until placement was correct
and then took down and sewed together.
I like the sweet touch it adds!


a few more cozy things...


Think they like it?!


Seeing their reactions was sooo great...seriously they were giddy!!
 I know they will have hours of fun in their room
under their new little teepee!!

I also added a couple push lights, they love turning them on and off
and we can turn down the lights at bedtime and just chill and play!

I'd love to see any removable teepees that you create.
I do ask if you use this tutorial that you 
kindly source it in your post {thank you!}
Please feel free to email me pictures or with any questions on this tutorial.
michelle{at}ourwonderfilledlife{dot}com.

I have also been collecting 
teepee inspiration via Pinterest.
This morning, I am linking up my teepee to...


 created by Katie, Emily, Lana, and Sherry. 
{yay, so fun!}

As well as linking up this tutorial to these lovely parties this week!
{thank you!}

And just to bring it full circle, I added my teepee tutorial to pinterest! {grin}


Thank you!


Photobucket
Related Posts Plugin for WordPress, Blogger...